
In this post React Basics Concepts Cheat Sheet we have explained all the concepts of React JS and how we can use React cheat sheet to create our first React App once we have understood React concepts well.
React is a popular js library devs use as a base for highly responsive interactive apps. It is used by devs Facebook and other dev community members. We can create awesome React mobile apps and single page web apps. Here we will cover most of React prerequisites including HTML, CSS, JavaScript, ES6, Nodejs and its package manager NPM.
Create a React Project
We are using Vite and NPM to create a React project
npm create viteNow we need to confirm it using Y or Enter key to select the React template and Variant JavaScript.
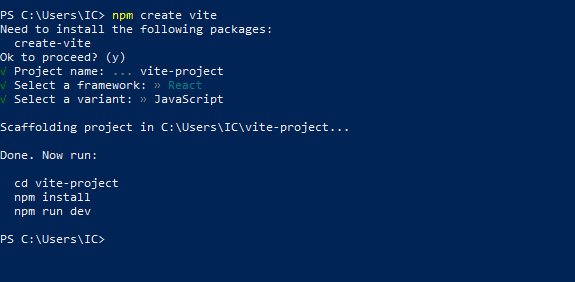
You can follow the complete guide to create React app with Vite and finally go to the Project directory to see the project typing npm run dev in the terminal it will show you the project on localhost.
npm run devit will appear like this:
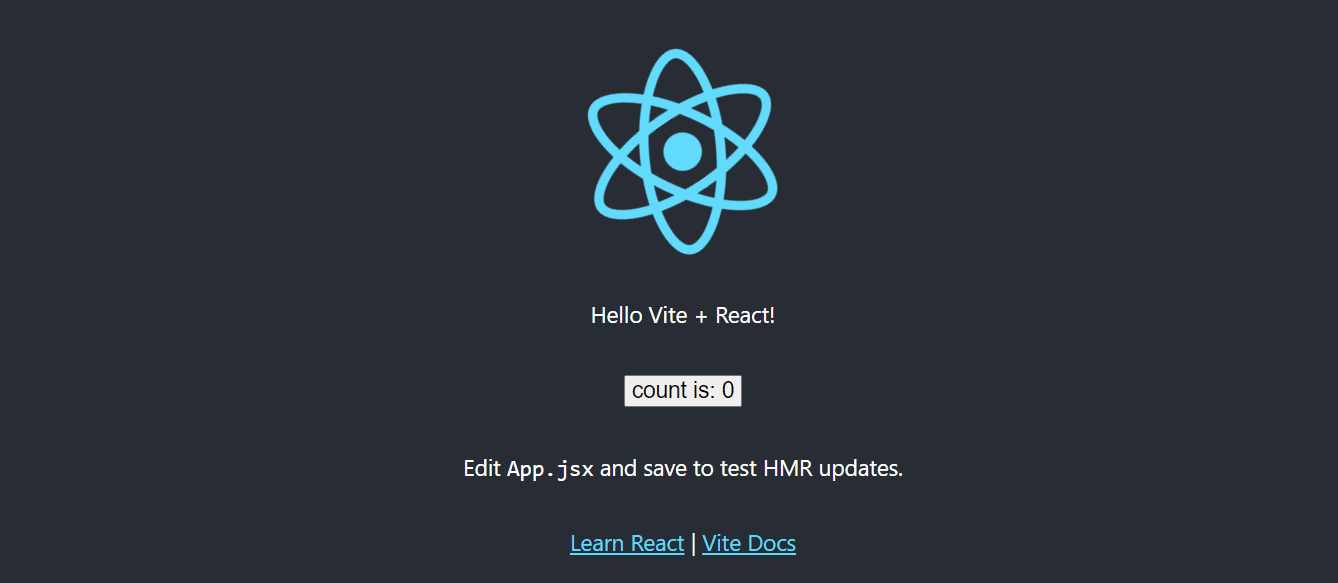
Here is the complete Vite React guide and documentation.
React Components
React Components
We can build react app to create UI as react components can be used more like lego blocks. These React blocks are simple and build complex UI apps. So to create React components we need to use this code piece:
function App() {
    return <h1>Hello World</h1>;
}
We can also use ES6 classes for creating React components here is how you should understand it’s vey difficult to follow up as compared to functional react components
class App extends React.Component {
    render() {
        return <h1>Hello World</h1>;
    }
}
We can also use arrows to create react app components:
const App = () => {
    return <h1>Hello World</h1>;
};
We need to understand that React component is a JavaScript function that returning us a React Element used as this sytanx:
<App />The components should always start with capital letters or else they will treated as DOM tags in React. We can embed inline JavaScript expressions and use curly braces in JSX:
const name = "George";
const App = () => {
    return <h1>Hello {name}, you have {Math.floor(Math.random() * 10)} new messages.</h1>;
};
React Props
Let’s say we are using a component for rendering the new messages. We have two options either hardcore its data or pass it as a props. Props in React act like function arguments. So we access props in a component using props objects and use props to pass data to the components. Let’s say we have a component NewMessage and we want to convey the user name as prop we will do it like this:
<NewMessage name="Unread Messages" /> Now we access name prop in the NewMessage component as used here:function NewMessage(props) {
return <h1>{props.name}</h1>;
}We can do destructuring as well like this:
function NewMessage({ name }) {
    return <h1>{name}</h1>;
}
When we have to pass other props like the class attribute, aria-label or any other we can use the spread operator to do this as shown here:
function NewMessage({ name, ...rest }) {
    return <h1 {...rest}>{name}</h1>;
}
And now we can use the following syntax to pass that props as shown here:
<NewMessage name="Unread Messages" style={{ color: "red" }} />
We can also use default values. Here are the default React props examples such as ProfileCard etc which you can use to return user profiles just replace the NewMessage with ProfileCard.
React Events
We can also add an event listener to a React element as we shown react element event here:
function App() {
    return <button onClick={() => alert("Hello World")}>Click here</button>;
}
The code will pass an anonymous function to onClick prop. We can also use a named function to pass if we want to. For example here we are using HandleClick
function handleClick() {
    alert("Hello World");
}

function App() {
    return <button onClick={handleClick}>Click here</button>;
}
We need to understand that State is a very important React part. We use it to store our data that we change according to needs after some time. For that we will create a state variable using useState hook. See the example:
import { useState } from "react";

function Counter() {
    const [count, setCount] = useState(0);

    return (
        <div>
            <h1>{count}</h1>
            <button onClick={() => setCount(count + 1)}>Increment</button>
            <button onClick={() => setCount(count - 1)}>Decrement</button>
        </div>
    );
}
Here you will notice as we click the increment button, the counter increases to 1 and as we click decrement button it
decreases by 1.
React useEffect
React uses the effects after each render as default settings. If we run the effects only then a specific value changes,
we are allowed to pass an array used as a second argument to the useEffect hook. Let’s say we want to run the effect only when count changes. For that we can do like this:
import { useState, useEffect } from "react";

function Counter() {
    // ...

    useEffect(() => {
        document.title = `You clicked ${count} times`;
    }, [count]);

    // ...
}
You will notice that the document title changes evey time count changes. We can use it effectively to run an effect just
once as the component mounts. Let’s say we want to change fetch data through APIs as a component mounts. We can use this code piece to do it:
import { useState, useEffect } from "react";

function App() {
    const [data, setData] = useState(null);

    useEffect(() => {
        fetch("https://jsonplaceholder.typicode.com/todos/1")
            .then((response) => response.json())
            .then((json) => setData(json));
    }, []);

    // ...
}
React Hooks
React Hooks are actually functions that are used for interacting with React features. Hooks can be used for creating state variables or fetch data. You will notice we already used above here like useState and useEffect and useState. We are also allowed to create our own React hooks. We need to understand that normally the react hooks can only be used inside React function component and must start using the word use.
React Loops
If you are using an array of data like this:
[
    {
        "id": 1,
        "title": "Hello World"
    },
    {
        "id": 2,
        "title": "Hello World 2"
    }
]
We can use it with the map method (JavaScript array method) for rendering certain list of React elements.
We can use the following syntax to render a todo-list like shown here:
import { useState } from "react";

function App() {
    const [todos, setTodos] = useState([
        {
            "id": 1,
            "title": "Hello World"
        },
        {
            "id": 2,
            "title": "Hello World 2"
        }
    ]);

    return (
        <ul>
            {todos.map((todo) => (
                <li key={todo.id}>{todo.title}</li>
            ))}
        </ul>
    );
}
Render will look like this:
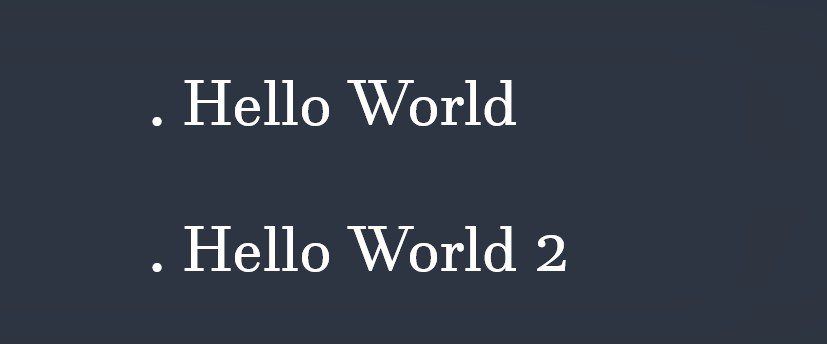
We can prevent rendering the same element twice in React with the help of key prop while rendering list of React elements inside a loop.
React Conditional Element
If we want to render a React element only if a certain condition is true we can. See the example here:
function App() {
    const [isLoggedIn, setIsLoggedIn] = useState(false);

    return (
        <div>
            {isLoggedIn && <h1>Hello World</h1>}
        </div>
    );
}
You will notice here just the logical AND operator is used. Therefore, when isLoggedIn variable is true, we will see
<h1>Hello World</h1>element rendered. It will return nothing if it’s false.
We can also show a message if isLoggedIn variable is false.
{isLoggedIn ? (
    <h1>Hello World</h1>
) : (
    <h1>You are not logged in</h1>
)}
Or we can return conditionally from a function:
function App() {
    if (isLoggedIn) {
        return <h1>Hello World</h1>;
    } else {
        return <h1>You are not logged in</h1>;
    }
}
We can create many such examples and you can create your own React apps once you understand the React basics. For more check React documentation here. That was all React basics concepts cheat sheet.

