JavaScript libraries are incredibly accurate when it comes to executing your code on the web. For instance, Redux is just there for state management which is a library for JS. By maintaining the state of the app we can make our apps more functional. We are also able to access the state in all our component parts of the app without having worried about the hierarchy that has the component. Today we would understand using Redux for a multiple number of purposes with code examples. First of all we need to setup React which you do easily and we have set up React in a number of previous examples:
- React Redux Functionality
- React Redux Store and Reducer Functionality
- Creating a Counter App Demo
- Adding Counter App Functionality
- Adding The Action and Reducer Functionality Counter App
- Rendering IndexJS Main Component
- Counter App Final Demo
There are few important things such as State, actions, reducers and store about Redux that everyone should know before working with it. While 3 basics need to be understood that control the Redux app.
1 – One of the most important things about Redux is the actions. Those actions deal two things— the type and state properties.
2 – The reducers or the functions are an other important aspect of Redux which provides the new state to the application by taking into account the action and the state of the app.
3 – The third most important aspect of Redux is the store which uses actions and reducers together to manage the state of the app.
React Redux Functionality
While working on React we are using a component that increases its value by 1 for each click. As soon as the user clicks the button an event handler function is called.
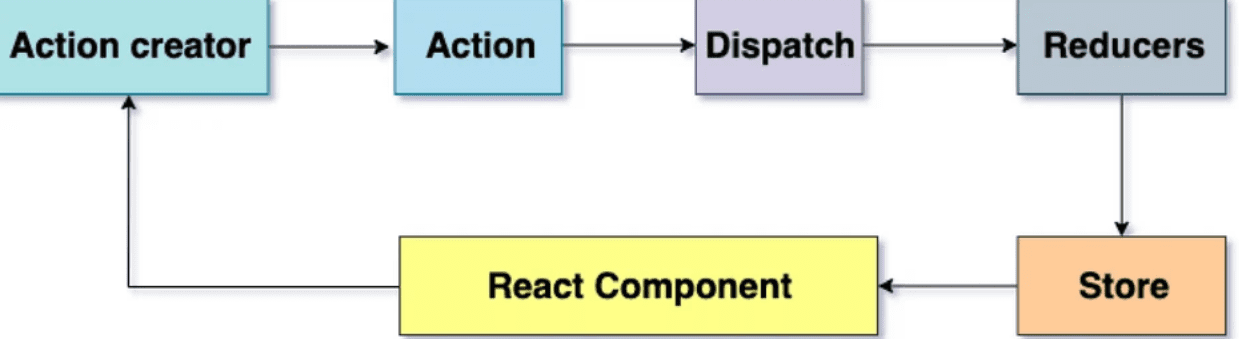
We have shown the flow of Redux, State, Action, Reducer and Store below. It starts with dispatch (a redux function) which dispatches an action when an event handler function is called. That action has two things, the type and the payload.
While we need to understand that the type describes the action name. Hence–INCREMENT here. So while the payload obviously represents data. So here we have incremented value by 1, hence the payload becomes 1(we can represent it with other numbers as well). Here is the better example to make it further clear
Once it’s complete the action would pass to the store. It’s basically kind of a cycle for each event that takes place.
React Redux Store and Reducer Functionality
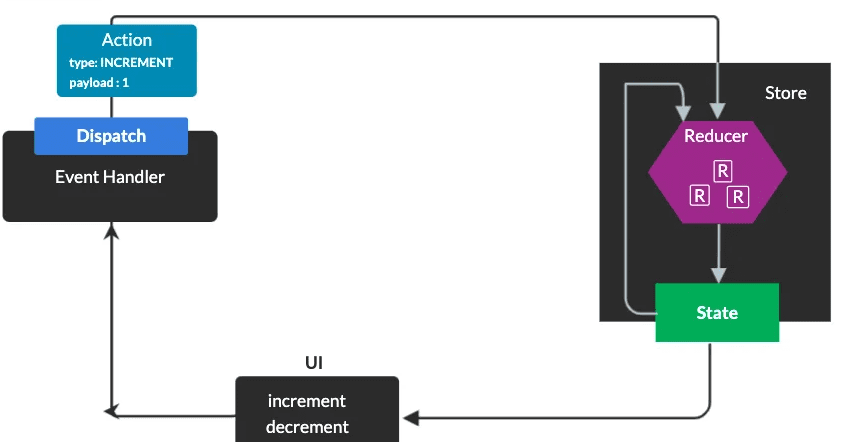
So the store in Redux is more like a database that updates the data once an action has taken place and updates the State. As soon as it receives the new data it adds up. While it uses the Reducer function to pass the data about the state and action and that information is passed to Reducer by the store. When all are combined a new state gets updated.
As the reducer sends back new state it updates in the store. Here you can see we got a 1 and it was received by the new component. As a result the new data gets rendered to display. See the chart here for more clarity.
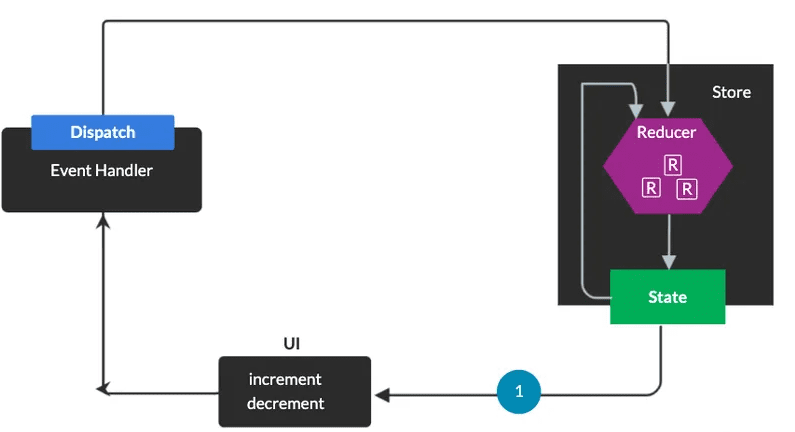
The next we are going to explain the whole phenomenon bit by bit to make the more sense out of this flow chart.
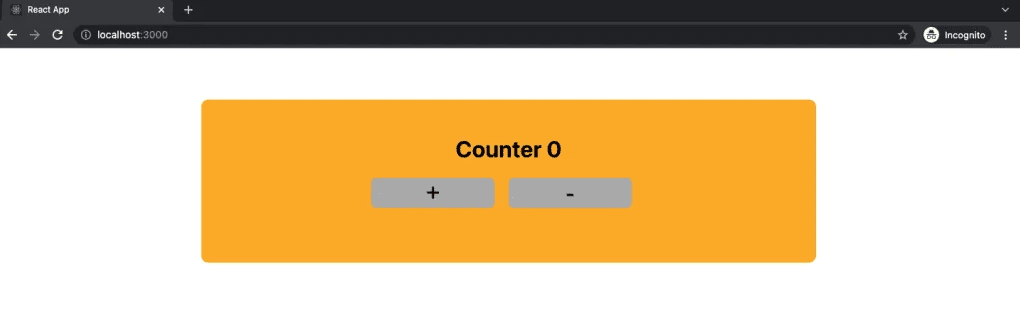
Creating a Counter App Demo
The next we are going to create a new design to give a demo
Adding Counter App Functionality
We would have to create few files to create our counter code example
Next we are to create a new component counter.js in our app’s components folder. The next folder would also be created with the name Redux and in it we would add 3 more folders for actions, reducer and store as seen in the code example here:
src
|__ components
|       |__ Counter.js
|
|__ redux
|       |__ actions
|       |         |__ actionTypes.js
|       |         |
|       |         |__ index.js
|       |
|       |__ reducers
|       |         |__ counterReducer.js
|       |         |
|       |         |__ index.js
|       |
|       |__ store
|                 |__ index.js
You can see that while running the dev in the browser we are just showing the code examples to demonstrate it’s main structure.
Assign Functions to Counter
We will begin assigning functions to our Counter.js component by adding the following code example in it.
Counter.js
import React from 'react';
import { useDispatch, useSelector } from 'react-redux';
import { increment, decrement } from '../redux/actions';

export const Counter = () => {

const counter = useSelector((state) => state.counterReducer.count);
const dispatch = useDispatch();

const handleIncrement = () => {
    dispatch(increment(1));
  };

  const handleDecrement = () => {
    dispatch(decrement(1));
  };

    return (
        <div>
            <h1>Counter {counter} </h1>
            <button className='btnStyle' onClick={()=>handleIncrement()}>+</button>
            <button className='btnStyle' onClick={()=>handleDecrement()}>-</button>
        </div>
    );
};
Adding The Action and Reducer Functionality Counter App
In this code example you can see we are going to add the action action types in action.Types.js.
actions/actionTypes.js

export const INCREMENT = 'INCREMENT';
export const DECREMENT = 'DECREMENT';
Now in the index.js file we would import the actions and assign the payload as seen in the code example here:
actions/index.js

import { INCREMENT, DECREMENT } from './actionTypes';

export const increment = (number) => {
  return {
    type: INCREMENT,
    payload: number
  };
};
export const decrement = (number) => {
  return {
    type: DECREMENT,
    payload: number
  };
};
Now we are opening counterReducer.js for adding the code there. We would also notice the reducer assessing the action type and returning the state based on it.
reducers/counterReducer.js

const initialState = {
  count: 0,
};

export const counterReducer = (state = initialState, action) => {
  switch (action.type) {
    case 'INCREMENT':
      return {
        ...state,
        count: state.count + action.payload
      };
  }
  switch (action.type) {
    case 'DECREMENT':
      return {
        ...state,
        count: state.count - action.payload
      };
    default:
      return state;
  }
};
The next we would go to reducers/index.js file and register the reducer in it see the code example here:
reducers/index.js

import { combineReducers } from 'redux';
import counterReducer from './counterReducer';

export default combineReducers({
    counterReducer,
})
Now we are going to create the redux store. We would use the following code example in store/index.js to do that:
store/index.js

import { createStore } from "redux";
import rootReducer from "../reducers";

const store = createStore(
  rootReducer,
  window.__REDUX_DEVTOOLS_EXTENSION__ && window.__REDUX_DEVTOOLS_EXTENSION__()
);
export default store;
Rendering IndexJS Main Component
Once we are done with all that. Now we are going to import this redux store in index.js. Now we need to import that store into the react component root which is where index.js is there for that job already. See the code example here how we can do import that store by using index.js which is already available by default.
index.js

import React from "react";
import ReactDOM from "react-dom";
import "./index.css";
import { App } from "./App";
import store from "./redux/store";
import { Provider } from "react-redux";

ReactDOM.render(
  <React.StrictMode>
    <Provider store={store}>
      <App />
    </Provider>
  </React.StrictMode>,
  document.getElementById("root")
);
Now finally once having done all of that we are going to open App.js to render our counter.js component. See the code example below:
App.js
import "./App.css";
import React from "react";
import { Counter } from "./components/Counter";

export const App = () => {
  return (
    <div className="app">
      <Counter />
    </div>
  );
};
Counter App Final Demo
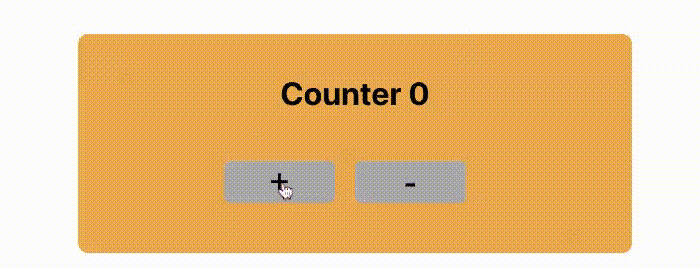
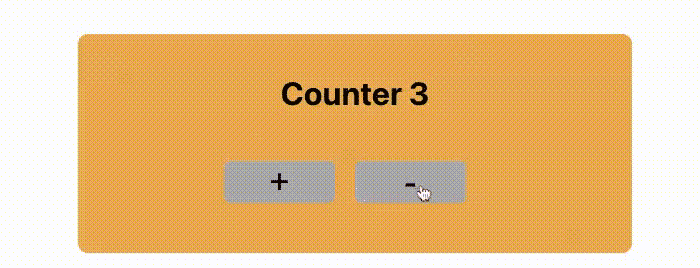
Now we would run the app to see how it has gotten alogn. As we would click the button the increment value would change and we would notice that responded by the state. While if we would decerement the value would be reduced by 1 or vice versa. You should know that while doing all that, the response data has been updated in realtime by the Redux. Here’s how it looks finally:
Finally, that’s all about using React Redux. That’s the reason React Redux is used for updating data in realtime while on decentralized applications. It works the best for dApps as much as it does for the regular web applications. We have learned today how to create a react redux app, how event are handled in it and the actions get dispatched automatically to the reducer. Then it returns us the state change on the basis of action-types and so on so forth.
Please note that you can add additional CSS however you want. It’s up to you to make it appear however you want.

