
In this How to use Laravel Livewire with CKEditor 5 tutorial we are using CKEditor 5 and TailwindCSS for styling.
We will install Livewire Package first with Composer:
composer require livewire/livewireIn our blade.php template we will create a Laravel layout with CKEditor resources/views/layouts/ckeditor.blade.php. You should set up JavaScrip and TailwindCSS locally while here we are using their Content Delivery Networks (CDNs).
<!DOCTYPE html>
<html lang="{{ str_replace('_', '-', app()->getLocale()) }}">
<head>
<meta charset="utf-8">
<meta name="viewport" content="width=device-width, initial-scale=1">
<meta name="csrf-token" content="{{ csrf_token() }}">

<title>How to Use Laravel Livewire with CKEditor 5 </title>

<link rel="stylesheet" href="https://fonts.googleapis.com/css3?family=Nunito:wght@400;600;700&display=swap">

<script src="https://cdn.tailwindcss.com"></script>

<script src="https://cdn.ckeditor.com/ckeditor5/27.1.0/classic/ckeditor.js"></script>

@livewireStyles
</head>

<body class="bg-gray-200" style="font-family: Nunito;">


<div class="max-w-7xl mx-auto px-4 py-4 sm:py-6 lg:py-8 sm:px-6 lg:px-8 ">
{{ $slot }}
</div>

@livewireScripts
@stack('scripts')
</body>
</html>
Setting up Livewire Component
Now we will use following command in the terminal to create our Livewire component for CKEditor
php artisan make:livewire CkeditorWe have two files generated which you can see below as well.
app/Http/Livewire/Ckeditor.php
resources/views/livewire/ckeditor.blade.php
So these two files serve respective purposes. Our resources/views/livewire/ckeditor.blade.php is the view file while app/Http/Livewire/Ckeditor.php is the our component class file.
Now we have to create content for our component class file we generated a while ago i-e app/Http/Livewire/CKeditor.php:
<?php

namespace App\Http\Livewire;

use Livewire\Component;

class Ckeditor extends Component
{
public $message;

public function render()
{
return view('livewire.ckeditor')
->layout('layouts.ckeditor');;
}
}
We have used $message variable for storing our message.
We have used Livewire component standards in the above code as we instructed Livewire with render() function to render our resources/views/livewire/ckeditor.blade.php view file with the help of resources/views/layouts/ckeditor.blade.php layout file. We will also customize the CKEditor according to our needs.
Setting up Livewire View
If you have followed along, you can copy/paste the following Livewire view file code which we have explained in detail and is pretty much self explanatory
<div>
    <div class="max-w-3xl mx-auto mb-2">
        <div class="bg-white rounded-lg">
            <div class="max-w-7xl mx-auto py-16 px-4 sm:py-24 sm:px-6 lg:px-8">
                <div class="text-center">
                    <p class="mt-1 text-4xl font-extrabold text-gray-900 sm:text-5xl sm:tracking-tight lg:text-6xl">
                        Laravel Livewire with CKEditor 5
                    </p>
                </div>
            </div>
        </div>
    </div>

    <div class="max-w-3xl mx-auto mb-2">
        <div class="bg-white rounded-lg p-5">

            <div class="flex flex-col space-y-10">
                <div wire:ignore>
                    <textarea wire:model="message"
                              class="min-h-fit h-48 "
                              name="message"
                              id="message"></textarea>
                </div>

                <div>
                    <span class="text-lg">You typed:</span>
                    <div class="w-full min-h-fit h-48 border border-gray-200">{{ $message }}</div>
                </div>
            </div>


        </div>
    </div>

</div>


@push('scripts')


    <script>
        ClassicEditor
            .create(document.querySelector('#message'))
            .then(editor => {
                editor.model.document.on('change:data', () => {
                @this.set('message', editor.getData());
                })
            })
            .catch(error => {
                console.error(error);
            });
    </script>


@endpush
While interacting with DOM we can manipulate it using the CKEditor which keeps mutating the DOM. But in that case the Livewire fails to track all of mutation, hence we use Livewire’s ignore tag i-e wire:ignore to contain it. So onwards Livewire will stop chasing that part of DOM. See the code below to clear the air:
<div wire:ignore>
    <textarea wire:model="message"
              class="min-h-fit h-48 "
              name="message"
              id="message"></textarea>
</div>
As we added ignore tag to Livewire it ignores the CKEditor changes, it also creates a mess for it in the component class to deal with our $message variable. Since we have to inform Livewire about the text in the textarea we will use $this blade directive and set the $message value. See the code below:
@push('scripts')


<script>
ClassicEditor
.create(document.querySelector('#message'))
.then(editor => {
editor.model.document.on('change:data', () => {
@this.set('message', editor.getData());
})
})
.catch(error => {
console.error(error);
});
</script>


@endpush
You can see adding $this blade directive we have set the $message variable value and the data change will be taken into consideration now.
Adding Routes
Next we are using routes/web.php to to inform our browser for rendering Livewire component with CKEditor 5. It will render our demo and help us see how our demo displays.
Route::get('/ckeditor', Ckeditor::class);Start Server
Finally we need to use Laravel to start server and see http://127.0.0.1:8000/ckeditor in our browser. The output will be like this.
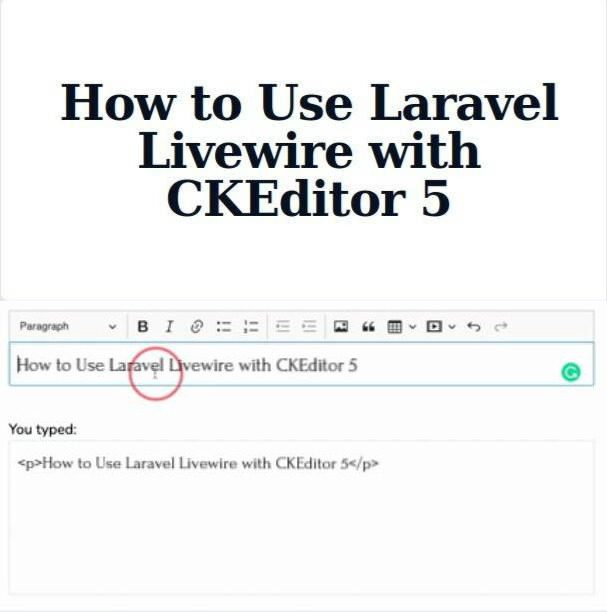
This is how we can use Laravel Livewire with CKEditor 5 to make amazing web apps. Let us know in the comments queries related to CKEditor 5 or livewire we will try our best to answer them.

